


Procedural Animation Techniques in Godwalker
How I managed to animated my entire thesis using procedural animation techniques

Introduction
Why do any of this? What’s the point of making procedural animations? At the time of starting this project as a solo developer I had no animation experience. Originally all characters either had treads for legs or were flying. Once I learned to animate in a professional context, I realized that I could apply many of the principles I learned to animate and move characters in Unity procedurally. This methodology has allowed me to save significant chunks of time. The animations controllers I’ve built in this project have two major types - Humanoid and Quadro-spider. The player is a humanoid procedural animator which uses a combination of IK and baked animations, while the Quadro-spider animator runs entirely on IK.
Player Animation (Humanoid)
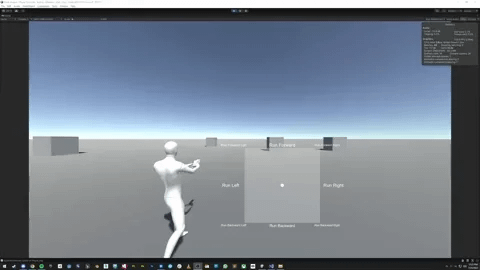
Right now animations are handled by procedural animation elements. The player’s body animations are run using an inverse kinematic animation rig controller. It takes the input of the player’s movement direction and plays a corresponding animation on the rig. Below you can see an example of the player corresponding to the moveset on the rig. When the joystick axis inputs forward, the forward animation plays. The white dot in the center of the graph represents how much of each animation percentage should be played. There are additional animations for diagonal running sequences. Below is an example from an early Praetor animation test
When it comes to weapons and arms, the player’s rig is overridden by the IK layer. The player’s torso and head are aimed in the direction that the camera is facing. From there, the gun then interpolates its position relative to the player. Each of the arms is then assigned a proper position to the gun. Each shot firing animation is built on a set of variables which determines gun kick, gun rotation, arm rotation, torso rotation, and head rotation. Each gun uses a different level of animation values to give them unique feelings.
For some more references into what this looked like previously, we can take a peek at Rock Hopper’s player character and see how stiff and rigid its movements are.

The player moves extremely slowly in comparison to the Godwalker character, and their movements are far more rigid and defined than the Praetor player. In this case the player is separated into two halves - the torso (upper) and their legs (lower). It was my first attempt at a procedurally animated character. This rig functions entirely on inverse kinematics. The body motions are rigidly tied to targets for the arms and legs. All of the running animations on the legs are based off of baked walk cycles. The shots firing from the guns are also pre-baked animations, but alternate. The torso does not move nor react to getting hit, all aspects are locked in place when moving, and there is very little feeling of momentum.
Below is an image of an early Rock Hopper animation rig test. In this case each sphere or geosphere acts as a pivot point, with red spheres acting as targets.

When comparing these two character controllers, it is easy to see the massive difference a good animator can do. Even though these both use the exact same movement and camera controller scripts, the Praetor example feels significantly more balanced and refined.
Quadro-Spider Animator
Now before you ask - I decided to make my enemies creepy walking spider tanks because they looked far more disturbing and threatening than enemies who used treads. As you can see from the screenshot below, this enemy definitely comes off significantly more cute than they do creepy or threatening.

In fact, I would argue the entire cast of enemies in Rock Hopper were simply too fun to have around. Below is an art test in which I feature all the enemies in the game, each of which relies on either flight or treads as a substitute for their lack of legs.

When developing Praetor I decided that I’ll need to build more menacing enemies. To do this I replaced the most friendly aspect of them with giant creepy spiky legs.
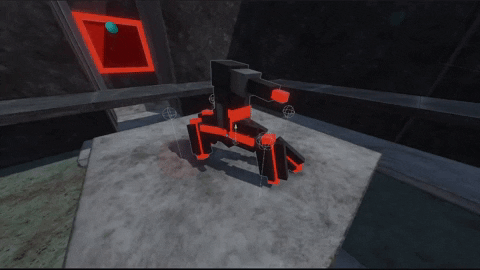
These spider-tank enemies were prototyped in the earliest versions of Rock Hopper but abandoned. I eventually did return to them and polish them up. Each leg runs independently on the IK step. The logic for each is simple - each foot has a current and target position. When the foot is further away from the target position than it is allowed to be, it walks further forward than the target position in the same direction it approaches it at. This results in a forward-stepping motion. Each foot also has a step forward distance, a return speed, and a randomized amount of step inaccuracy. All of these elements working in tandem allows for the spider-animators to make their legs move with specificity and naturality.
There are a few other tricks at play here. To ensure the legs don’t all move exactly at the same time, there is a bit of alternating logic in when they are allowed to move. Unless two or more legs are outside of their minimum target (the agent has made a sudden movement) each leg must perform its action at a different time than another leg, in sequence. This creates alternating animal-like leg motions which are perceptively more natural. During a dash which moves faster than the step return speed, it appears the enemy is dashing as it makes its move.

Procedural Player Weapon Animations
Animation Variables
Within Godwalker, each weapon has a set of variables which define how that weapon moves and acts when fired. Each weapon is placed on the player rig, and moves along with the IK animations. The position and direction of weapon models does not affect the direction of bullets towards their targets, but it does affect the position at which they leave the gun.

Each weapon has variables to adjust their weapon kick, weapon recoil rotation, and body recoil rotation. None of these animations change the rotation of the player’s camera, or cause inaccuracy.
Weapon kick is a Vector3 which dictates how far on each axis the weapon is moved whenever a shot is fired from it.
Weapon Recoil Rotation is a Vector3 which is translated into a Quaternion Euler. It dictates how much the weapon rotates on its own origin axis when fired.
Body Recoil Rotation taps into the player’s procedural animator to add to the rotational target of the player’s IK torso. This is used when we want to rotate the weapon using the player’s body rather than the weapon’s
Using these three variables we are able to make a plethora of weapon animations. Here are a few different examples of what those animations look like.
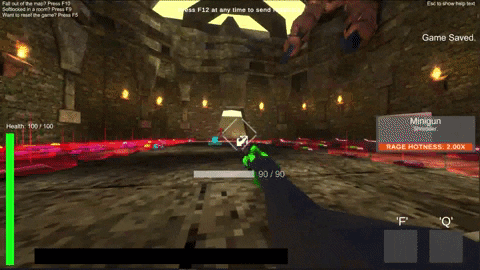
Minigun
In this example the minigun has quite a direct kick. It moves backwards towards the player heavily, and rotates pretty subtly downwards, away from the camera. This results in highlighting the barrel with a motion that gives the impression of intensity and stability. It also very clearly displays the wide spread of the weapon’s bullets.

Auto Pistol
The Auto Pistol and the Minigun have the same fire rate, but using a much more slight movement on both the Y and Z axes, and a combination of much stronger rotations of both the weapon and body, the Auto Pistol has a completely different feel. It feels cheaper but much more accurate, which is exactly what this weapon does.


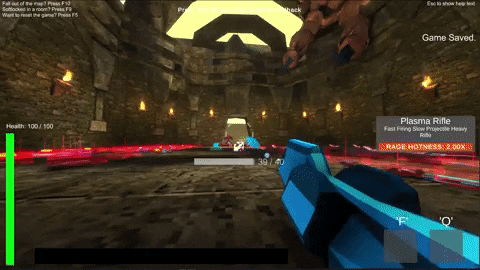
Plasma Rifle
This weapon is a sort of midpoint between the feels of a Minigun and an Auto Pistol. Each shot feels far more impactful. The weapon is moving backwards towards the player, and downwards slightly. There is also no weapon rotation, only body rotation. This results in a rapid bouncing action that makes it feel as if this weapon is propelling shots out of it. Since the archetype of the Plasma Rifle is to fire slow moving projectiles, this animation caters to it well.

Double Barreled Shotgun
The Double Barreled Shotgun and the Plasma Rifle actually share the same variables - with one key difference: Fire rate. The Plasma Rifle rarely settles back into its original position after being fired, where as the Shotgun finds itself sitting in the player’s hands far longer after each shot. Rather than a bouncing motion we get a kicking powerful motion that sits is registered by our brains for longer.


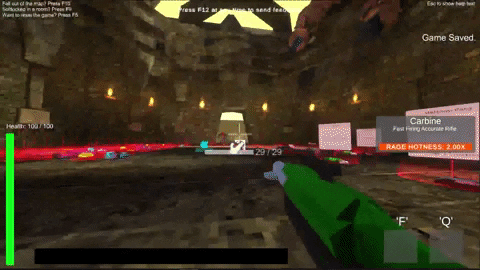
Carbine
This weapon has a lower fire rate than the other automatic weapons presented here, and a limited range. To give the player a more accurate feel of how long each bullet lasts, I attempted to tune the positional kick of the weapon back and forth just about how long the bullets live for. In testing this more simple-to-read animation has helped players get a feel for the weapon, especially when compared to similar weapon variants without these tuned values.

Additional Weapon Animation Techniques
Camera FOV Kick
Each weapon’s firing animation also comes with a level of camera FOV kick. The more significant the shot fired, the heavier the kick. The heaviest kick in the game is an additional of 4 FOV, while the most subtle is about 0.5 FOV. In the example below we can see how the FOV kick can be used in other contexts to supplement game feel, such as when the player uses their Dash.
Player Body Rotation Flick
When taking damage the player’s body IK rotation is flicked randomly. This random shunt around does not move the camera, but all elements of the player’s procedural animations are interrupted and moved awkwardly. It creates a much more intense feeling of getting hit. During these animations there are no FOV or weapon-specific IK modifications. Any more input on those areas would result in too much input for the player to properly read. Doing a more simple kick and return brings a more intense and simple feel.

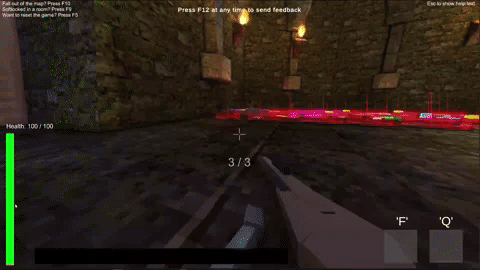
Player IK Hand Positions
Another consideration is, where are the player’s hands on the weapon? In most shooters, the player’s hands are specifically animated per weapon, with blending animations being used to cycle between different actions. In this case I store each hand position on each weapon so that the player can quickly and easily set the IK position of their rig’s hands. In the example on blow, we can see the two gizmo’d targets.

Final Thoughts
When building procedural animations for the purposes of a more expedited production, it is important to ensure their reusability. All of these systems have widespread compatibility to the project that I was working on, and I was able to build and reuse them so much due to their applicability. When constructing your own tools, ensure you are choosing the aspects of animation that suit the needs of your project. The more reusable your tool, the more you’ll be able to do as a creator.